How To Optimize Your Site With HTTP Caching

I’ve been on a web tweaking kick lately: how to speed up your javascript, gzip files with your server, and know how to set up caching. But the reason is simple: site performance is a feature.

For web sites, speed may be feature #1. Users hate waiting, we get frustrated by buffering videos and pages that pop together as images slowly load. It’s a jarring (aka bad) user experience. Time invested in site optimization is well worth it, so let’s dive in.

What is Caching?

Caching is a great example of the ubiquitous time-space tradeoff in programming. You can save time by using space to store results.

In the case of websites, the browser can save a copy of images, stylesheets, javascript or the entire page. The next time the user needs that resource (such as a script or logo that appears on every page), the browser doesn’t have to download it again. Fewer downloads means a faster, happier site.

Here’s a quick refresher on how a web browser gets a page from the server:
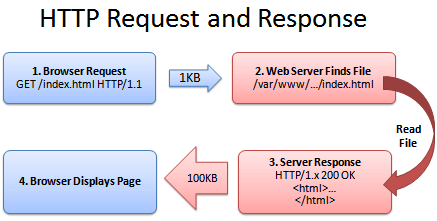
HTTP request

  1. Browser: Yo! You got index.html?
  2. Server: (Looking it up…)
  3. Sever: Totally, dude! It’s right here!
  4. Browser: That’s rad, I’m downloading it now and showing the user.

(The actual HTTP protocol may have minor differences.)

Caching’s Ugly Secret: It Gets Stale

Caching seems fun and easy. The browser saves a copy of a file (like a logo image) and uses this cached (saved) copy on each page that needs the logo. This avoids having to download the image ever again and is perfect, right?

Wrongo. What happens when the company logo changes? Amazon.com becomes Nile.com? Google becomes Quadrillion?

We’ve got a problem. The shiny new logo needs to go with the shiny new site, caches be damned.

So even though the browser has the logo, it doesn’t know whether the image can be used. After all, the file may have changed on the server and there could be an updated version.

So why bother caching if we can’t be sure if the file is good? Luckily, there’s a few ways to fix this problem.

Caching Method 1: Last-Modified

One fix is for the server to tell the browser what version of the file it is sending. A server can return a Last-modified date along with the file (let’s call it logo.png), like this:

Last-modified: Fri, 16 Mar 2007 04:00:25 GMT
File Contents (could be an image, HTML, CSS, Javascript...)`

Now the browser knows that the file it got (logo.png) was created on Mar 16 2007. The next time the browser needs logo.png, it can do a special check with the server:
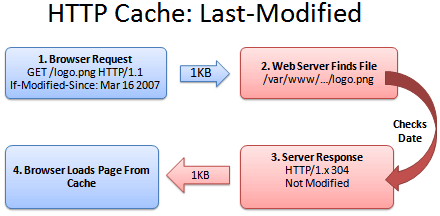
HTTP caching last modified

  1. Browser: Hey, give me logo.png, but only if it’s been modified since Mar 16, 2007.
  2. Server: (Checking the modification date)
  3. Server: Hey, you’re in luck! It was not modified since that date. You have the latest version.
  4. Browser: Great! I’ll show the user the cached version.

Sending the short “Not Modified” message is a lot faster than needing to download the file again, especially for giant javascript or image files. Caching saves the day (err… the bandwidth).

Caching Method 2: ETag

Comparing versions with the modification time generally works, but could lead to problems. What if the server’s clock was originally wrong and then got fixed? What if daylight savings time comes early and the server isn’t updated? The caches could be inaccurate.

ETags to the rescue. An ETag is a unique identifier given to every file. It’s like a hash or fingerprint: every file gets a unique fingerprint, and if you change the file (even by one byte), the fingerprint changes as well.

Instead of sending back the modification time, the server can send back the ETag (fingerprint):

ETag: ead145f
File Contents (could be an image, HTML, CSS, Javascript...)

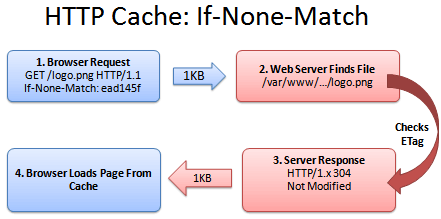
The ETag can be any string which uniquely identifies the file. The next time the browser needs logo.png, it can have a conversation like this:
HTTP caching if none match

  1. Browser: Can I get logo.png, if nothing matches tag “ead145f”?
  2. Server: (Checking fingerprint on logo.png)
  3. Server: You’re in luck! The version here is “ead145f”. It was not modified.
  4. Browser: Score! I’ll show the user my cached version.

Just like last-modifed, ETags solve the problem of comparing file versions, except that “if-none-match” is a bit harder to work into a sentence than “if-modified-since”. But that’s my problem, not yours. ETags work great.

Caching Method 3: Expires

Caching a file and checking with the server is nice, except for one thing: we are still checking with the server. It’s like analyzing your milk every time you make cereal to see whether it’s safe to drink. Sure, it’s better than buying a new gallon each time, but it’s not exactly wonderful.

And how do we handle this milk situation? With an expiration date!

If we know when the milk (logo.png) expires, we keep using it until that date (and maybe a few days longer, if you’re a college student). Once it’s expired, we contact the server for a fresh copy, with a new expiration date. The header looks like this:

Expires: Tue, 20 Mar 2007 04:00:25 GMT
File Contents (could be an image, HTML, CSS, Javascript...)

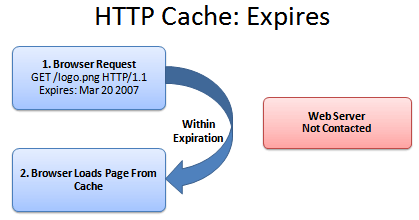
In the meantime, we avoid even talking to the server if we’re in the expiration period:
HTTP caching expires

There isn’t a conversation here; the browser has a monologue.

  1. Browser: Self, is it before the expiration date of Mar 20, 2007? (Assume it is).
  2. Browser: Verily, I will show the user the cached version.

And that’s that. The web server didn’t have to do anything. The user sees the file instantly.

Caching Method 4: Max-Age

Oh, we’re not done yet. Expires is great, but it has to be computed for every date. The max-age header lets us say “This file expires 1 week from today”, which is simpler than setting an explicit date.

Max-Age is measured in seconds. Here’s a few quick second conversions:

  • 1 day in seconds = 86400
  • 1 week in seconds = 604800
  • 1 month in seconds = 2629000
  • 1 year in seconds = 31536000 (effectively infinite on internet time)

Bonus Header: Public and Private

The cache headers never cease. Sometimes a server needs to control when certain resources are cached.

  • Cache-control: public means the cached version can be saved by proxies and other intermediate servers, where everyone can see it.
  • Cache-control: private means the file is different for different users (such as their personal homepage). The user’s private browser can cache it, but not public proxies.
  • Cache-control: no-cache means the file should not be cached. This is useful for things like search results where the URL appears the same but the content may change.

However, be wary that some cache directives only work on newer HTTP 1.1 browsers. If you are doing special caching of authenticated pages then read more about caching.

Ok, I’m Sold: Enable Caching

First, make sure Apache has mod_headers and mod_expires enabled:

... list your current modules...
apachectl -t -D DUMP_MODULES

... enable headers and expires if not in the list above...
a2enmod headers
a2enmod expires

The general format for setting headers is

  • File types to match
  • Header / Expiration to set

A general tip: the less a resource changes (images, pdfs, etc.) the longer you should cache it. If it never changes (every version has a different URL) then cache it for as long as you can (i.e. a year)!

One technique: Have a loader file (index.html) which is not cached, but that knows the locations of the items which are cached permanently. The user will always get the loader file, but may have already cached the resources it points to.

The following config settings are based on the ones at AskApache.

Seconds Calculator

All the times are given in seconds (A0 = Access + 0 seconds).

Using Expires Headers

ExpiresActive On
ExpiresDefault A0

# 1 YEAR - doesn't change often
<FilesMatch "\.(flv|ico|pdf|avi|mov|ppt|doc|mp3|wmv|wav)$">
ExpiresDefault A31536000
</FilesMatch>

# 1 WEEK - possible to be changed, unlikely
<FilesMatch "\.(jpg|jpeg|png|gif|swf)$">
ExpiresDefault A604800
</FilesMatch>

# 3 HOUR - core content, changes quickly
<FilesMatch "\.(txt|xml|js|css)$">
ExpiresDefault A10800
</FilesMatch>

Again, if you know certain content (like javascript) won’t be changing often, have “js” files expire after a week.

Using max-age headers:

# 1 YEAR
<FilesMatch "\.(flv|ico|pdf|avi|mov|ppt|doc|mp3|wmv|wav)$">
Header set Cache-Control "max-age=31536000, public"
</FilesMatch>

# 1 WEEK
<FilesMatch "\.(jpg|jpeg|png|gif|swf)$">
Header set Cache-Control "max-age=604800, public"
</FilesMatch>

# 3 HOUR
<FilesMatch "\.(txt|xml|js|css)$">
Header set Cache-Control "max-age=10800"
</FilesMatch>

# NEVER CACHE - notice the extra directives
<FilesMatch "\.(html|htm|php|cgi|pl)$">
Header set Cache-Control "max-age=0, private, no-store, no-cache, must-revalidate"
</FilesMatch>

Final Step: Check Your Caching

To see whether your files are cached, do the following:

  • Online: Examine your site in Redbot (You’ll see the headers returned, and a cache summary on the side)
  • In Firefox: Use FireBug or Live HTTP Headers to see the HTTP response (304 Not Modified, Cache-Control, etc.). In particular, I’ll load a page and use Live HTTP Headers to make sure no packets are being sent to load images, logos, and other cached files. If you press ctrl+refresh the browser will force a reload of all files.
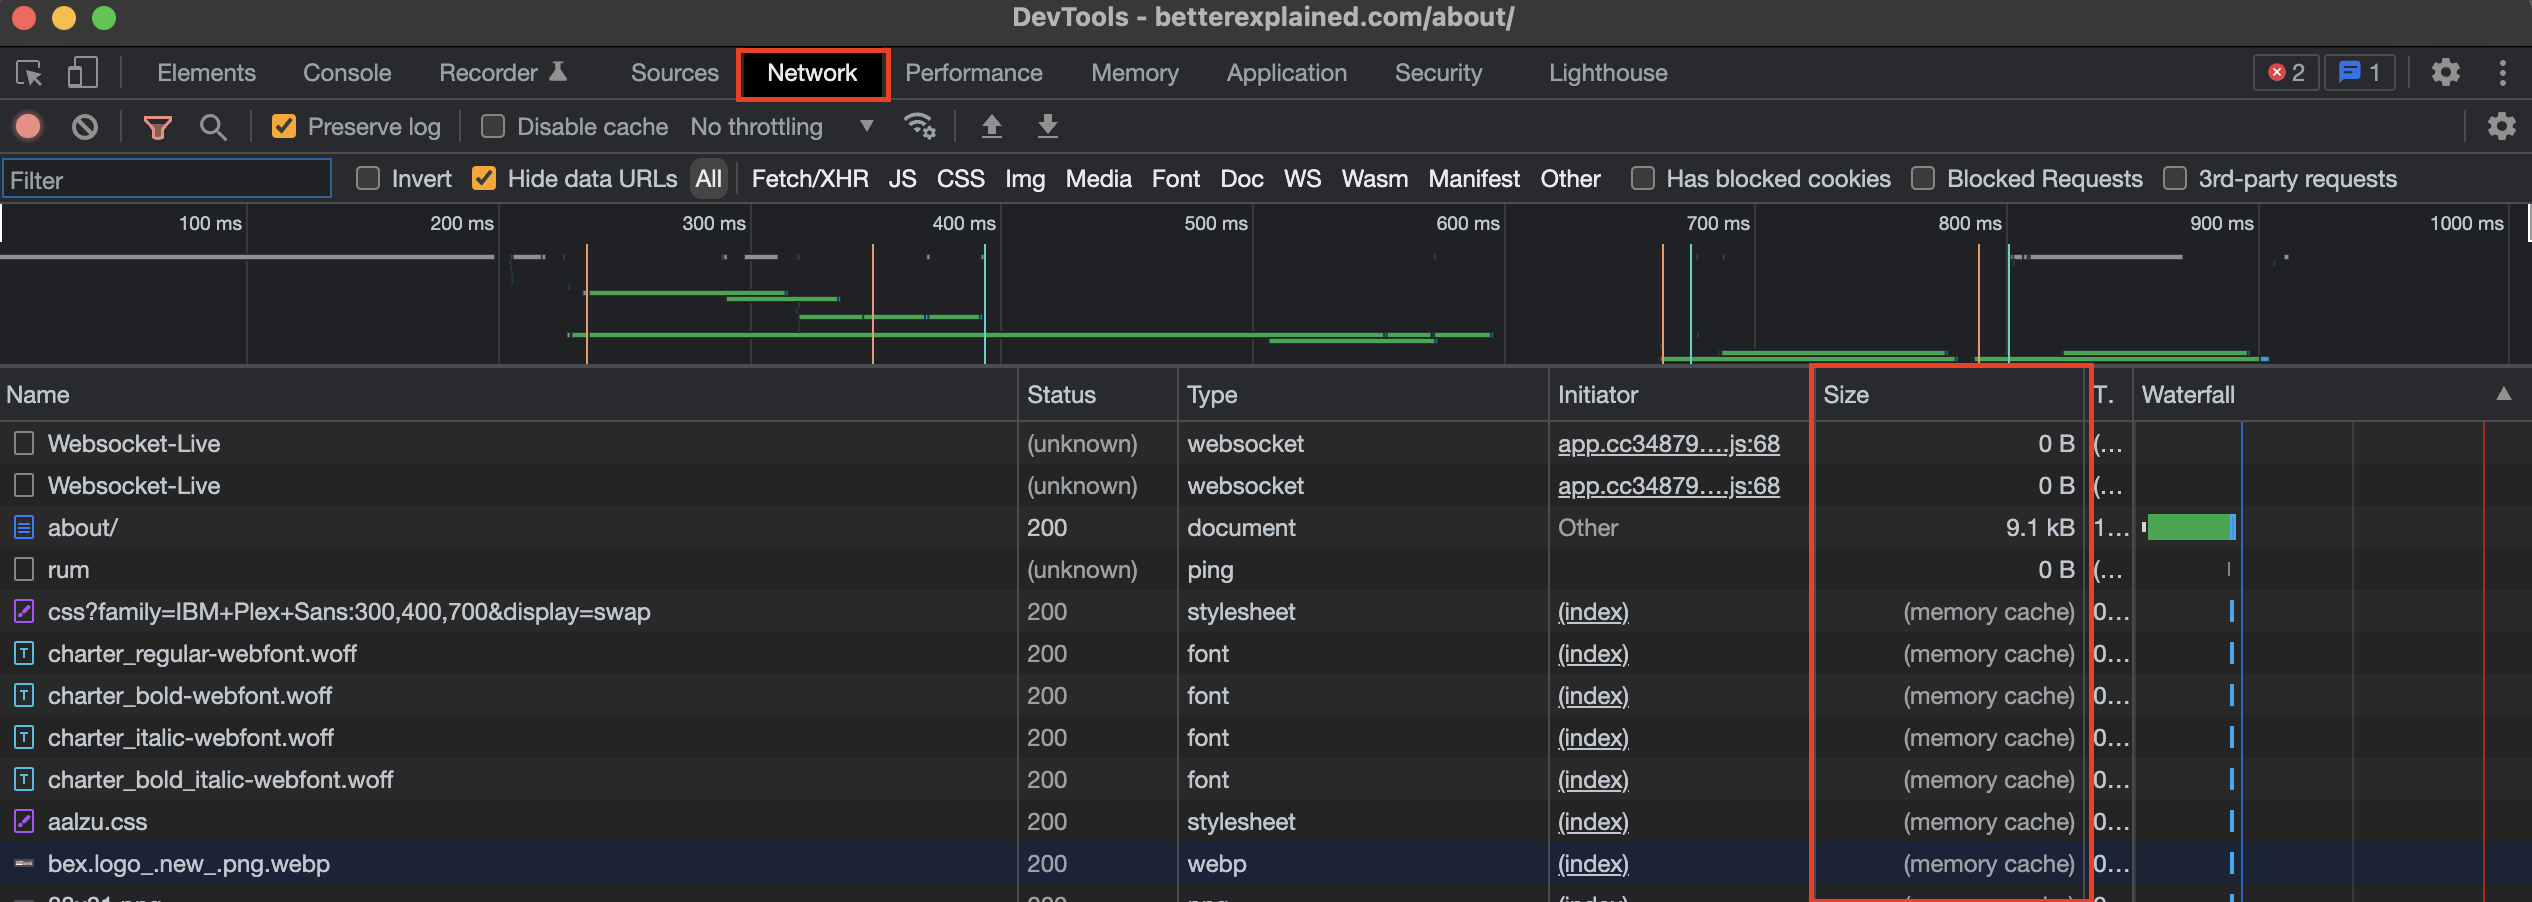
  • In Chrome: Open Developer Tools > Network tab. In the size column, you’ll see “memory cache” or “disk cache” instead of a download size. (Make sure “disable cache” isn’t enabled!)
Read more about caching, or the HTTP header fields. Caching doesn’t help with the initial download (that’s what gzip is for), but it makes future site visits faster.

Remember: Creating unique URLs is the simplest way to caching heaven. Have fun streamlining your site!
Join 450k Monthly Readers

Enjoy the article? There's plenty more to help you build a lasting, intuitive understanding of math. Join the newsletter for bonus content and the latest updates.

How To Optimize Your Site With GZIP Compression

Compression is a simple, effective way to save bandwidth and speed up your site. I hesitated when recommending gzip compression when speeding up your javascript because of problems in older browsers.

But it’s the 21st century. Most of my traffic comes from modern browsers, and quite frankly, most of my users are fairly tech-savvy. I don’t want to slow everyone else down because somebody is chugging along on IE 4.0 on Windows 95. Google and Yahoo use gzip compression. A modern browser is needed to enjoy modern web content and modern web speed — so gzip encoding it is. Here’s how to set it up.

Wait, wait, wait: Why are we doing this?

Before we start I should explain what content encoding is. When you request a file like http://www.yahoo.com/index.html, your browser talks to a web server. The conversation goes a little like this:

HTTP request regular

  1. Browser: Hey, GET me /index.html
  2. Server: Ok, let me see if index.html is lying around…
  3. Server: Found it! Here’s your response code (200 OK) and I’m sending the file.
  4. Browser: 100KB? Ouch… waiting, waiting… ok, it’s loaded.

Of course, the actual headers and protocols are much more formal (monitor them with Live HTTP Headers if you’re so inclined).

But it worked, and you got your file.

So what’s the problem?

Well, the system works, but it’s not that efficient. 100KB is a lot of text, and frankly, HTML is redundant. Every <html>, <table> and <div> tag has a closing tag that’s almost the same. Words are repeated throughout the document. Any way you slice it, HTML (and its beefy cousin, XML) is not lean.

And what’s the plan when a file’s too big? Zip it!

If we could send a .zip file to the browser (index.html.zip) instead of plain old index.html, we’d save on bandwidth and download time. The browser could download the zipped file, extract it, and then show it to user, who’s in a good mood because the page loaded quickly. The browser-server conversation might look like this:

HTTP request compressed

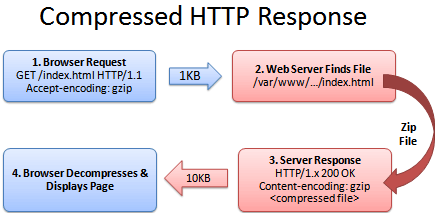
  1. Browser: Hey, can I GET index.html? I’ll take a compressed version if you’ve got it.
  2. Server: Let me find the file… yep, it’s here. And you’ll take a compressed version? Awesome.
  3. Server: Ok, I’ve found index.html (200 OK), am zipping it and sending it over.
  4. Browser: Great! It’s only 10KB. I’ll unzip it and show the user.

The formula is simple: Smaller file = faster download = happy user.

Don’t believe me? The HTML portion of the yahoo home page goes from 101kb to 15kb after compression:

yahoo_compression.PNG

The (not so) hairy details

The tricky part of this exchange is the browser and server knowing it’s ok to send a zipped file over. The agreement has two parts

  • The browser sends a header telling the server it accepts compressed content (gzip and deflate are two compression schemes): Accept-Encoding: gzip, deflate

  • The server sends a response if the content is actually compressed: Content-Encoding: gzip

If the server doesn’t send the content-encoding response header, it means the file is not compressed (the default on many servers). The “Accept-encoding” header is just a request by the browser, not a demand. If the server doesn’t want to send back compressed content, the browser has to make do with the heavy regular version.

Setting up the server

The “good news” is that we can’t control the browser. It either sends the Accept-encoding: gzip, deflate header or it doesn’t.

Our job is to configure the server so it returns zipped content if the browser can handle it, saving bandwidth for everyone (and giving us a happy user).

For IIS, enable compression in the settings.

In Apache, enabling output compression is fairly straightforward. Add the following to your .htaccess file:

# compress text, html, javascript, css, xml:
AddOutputFilterByType DEFLATE text/plain
AddOutputFilterByType DEFLATE text/html
AddOutputFilterByType DEFLATE text/xml
AddOutputFilterByType DEFLATE text/css
AddOutputFilterByType DEFLATE application/xml
AddOutputFilterByType DEFLATE application/xhtml+xml
AddOutputFilterByType DEFLATE application/rss+xml
AddOutputFilterByType DEFLATE application/javascript
AddOutputFilterByType DEFLATE application/x-javascript

# Or, compress certain file types by extension:
<files *.html>
SetOutputFilter DEFLATE
</files>

Apache actually has two compression options:

  • mod_deflate is easier to set up and is standard.
  • mod_gzip seems more powerful: you can pre-compress content.

Deflate is quick and works, so I use it; use mod_gzip if that floats your boat. In either case, Apache checks if the browser sent the “Accept-encoding” header and returns the compressed or regular version of the file. However, some older browsers may have trouble (more below) and there are special directives you can add to correct this.

If you can’t change your .htaccess file, you can use PHP to return compressed content. Give your HTML file a .php extension and add this code to the top:

In PHP:

<?php if (substr_count($_SERVER[‘HTTP_ACCEPT_ENCODING’], ‘gzip’)) ob_start(“ob_gzhandler”); else ob_start(); ?>

We check the “Accept-encoding” header and return a gzipped version of the file (otherwise the regular version). This is almost like building your own webserver (what fun!). But really, try to use Apache to compress your output if you can help it. You don’t want to monkey with your files.

Verify Your Compression

Once you’ve configured your server, check to make sure you’re actually serving up compressed content.

  • Online: Use the online gzip test to check whether your page is compressed.

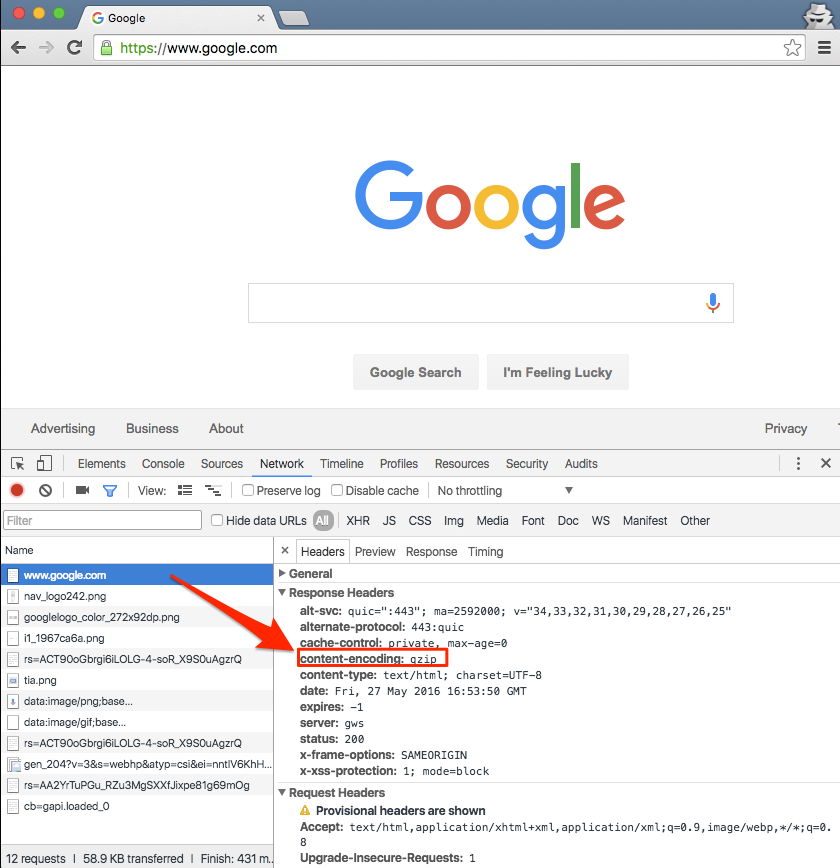
  • In your browser: In Chrome, open the Developer Tools > Network Tab (Firefox/IE will be similar). Refresh your page, and click the network line for the page itself (i.e., www.google.com). The header “Content-encoding: gzip” means the contents were sent compressed.

chrome gzip header

Click the “Use large rows” icon to get more details, including the compressed transfer size and the true content size.

content size

Be prepared to marvel at the results. The instacalc homepage shrunk from 36k to 10k, a 75% reduction in size.

Try Some Examples

I’ve set up some pages and a downloadable example:

  • index.html – No explicit compression (on this server, I am using compression by default).
  • index.htm – Explicitly compressed with Apache .htaccess using *.htm as a rule
  • index.php – Explicitly compressed using the PHP header

Feel free to download the files, put them on your server and tweak the settings.

Caveats

As exciting as it may appear, HTTP Compression isn’t all fun and games. Here’s what to watch out for:

  • Older browsers: Yes, some browsers still may have trouble with compressed content (they say they can accept it, but really they can’t). If your site absolutely must work with Netscape 1.0 on Windows 95, you may not want to use HTTP Compression. Apache mod_deflate has some rules to avoid compression for older browsers.

  • Already-compressed content: Most images, music and videos are already compressed. Don’t waste time compressing them again. In fact, you probably only need to compress the “big 3” (HTML, CSS and Javascript).

  • CPU-load: Compressing content on-the-fly uses CPU time and saves bandwidth. Usually this is a great tradeoff given the speed of compression. There are ways to pre-compress static content and send over the compressed versions. This requires more configuration; even if it’s not possible, compressing output may still be a net win. Using CPU cycles for a faster user experience is well worth it, given the short attention spans on the web.

Enabling compression is one of the fastest ways to improve your site’s performance. Go forth, set it up, and let your users enjoy the benefits.

Join 450k Monthly Readers

Enjoy the article? There's plenty more to help you build a lasting, intuitive understanding of math. Join the newsletter for bonus content and the latest updates.

How To Debug Web Applications With Firefox

Debugging is one of the most painful parts of developing web apps. You have to deal with browser inconsistencies with HTML, CSS and javascript, let alone the difficulty of debugging javascript itself.

Here’s a rundown of the Firefox extensions I use to manage this madness.

Taming CSS: Web Developer Toolbar

Install Web Developer Toolbar. Just do it.

Debugging CSS can be really frustrating. The Web Developer Toolbar lets you inspect and edit (in real-time) the HTML and CSS of your page, so you can see what’s happening when things don’t line up. It can do a heck of a lot more, but here’s what I use it for:

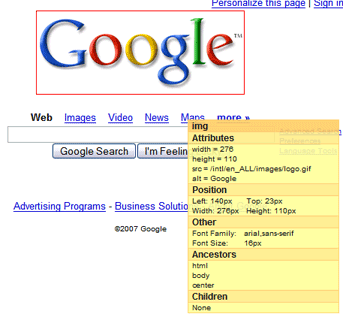
Ctrl + Shift + F: Display element information. This puts a red box under your mouse. Move the mouse over an element and its attributes appear in a pop-up: the name, class, pixel sizes, fonts, everything. Here’s what you can do:

  • Figure out what classes are creating the styles you see
  • Easily get the div’s id for use with Firebug (below)
  • Figure out how big an image is (pixel height and width)

web_developer_google.png

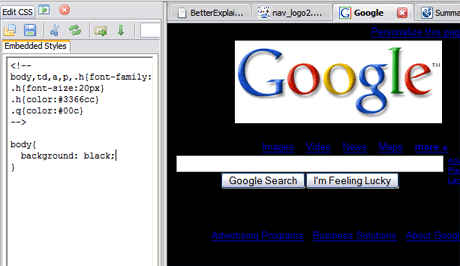
Ctrl + Shift + E: Edit CSS. This pops open a sidebar tab with the current stylesheets. You can edit any attributes and see the effect in real-time (like giving Google a black background):

web_developer_google_black.png

My favorite CSS style is border: 1px solid red;

I’ve done the following hundreds of times during the course of web development:

  • Find a div with your mouse (ctrl + shift + f)
  • Get its id
  • Edit CSS (ctrl + shift + e)
  • Put a border on the div: #mydiv{border: 1px solid red;}
  • Play with widths, heights, margins and paddings until it lines up nicely
  • Remove the border

But rather than deleting the border, put an “x” in front: “xborder: 1px solid red”. The CSS won’t be valid so the border is ignored, but keeps the style around in case you want to enable it later.

Select all the text in your edited CSS file and paste it into the real CSS file. Bam, your changes are now live. It’s almost the reverse of creating a file in DreamWeaver and viewing it in Firefox. You are viewing the live file in Firefox, making changes, and copying those back into your text editor. I’ve found this very effective for editing CSS, you avoid the constant back-and-forth switching because Firefox now has a CSS editor.

Bonus: ColorZilla Picks Colors

ColorZilla gives you a dropper that can find the hex RGB value (#123456) of anything on the page. This is great when designing, and you want to match a font color to a color in your page. This is way faster than taking a screenshot and opening it up in Photoshop.

Keeping Javascript In Line: Firebug

Firebug, how I love thee (or get the bookmarklet for other browsers). If you love yourself you will install it immediately and save countless hours of frustration.

Firebug can debug javascript, examine the DOM, and do much more (you can and should read all about it). Here’s how I use it:

F12: Open Firebug. You may have to enable it for the page.

Console Tab: Write quick javascript commands — it even has autocomplete on variable names and properties. Play around with your functions, change CSS attributes, add elements to the page — whatever it takes to test.

Script Tab (Debugging): Best. Feature. Ever. Click on a line number to set a breakpoint (red dot) in your javascript. Reload the page and it will break (pause) when it encounters the line.

At this point, you can switch over to the console to examine and change variables, and figure out what the heck is going on when your code won’t work. You can then hit the blue “play” button and continue running your app, until the next breakpoint.

Net Tab: Find the download performance of your page.

Profile Button (on Console Tab): Find the run-time performance of your page. Click “profile” to begin capturing information, do some commands, and then click stop. You’ll get a report of where your code spends its time. If you must optimize, optimize the common-case first.

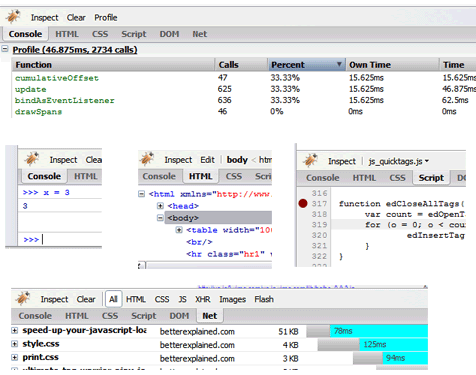
If you are a more visual person, try this awesome collage:

firebug_awesome_collage.png

Not satisfied? Check out the examples on the home page.

Dive into the details: Live HTTP Headers

Sometimes you need to dive into the nitty-gritty. What cache headers is my site sending back? Are my pages really gzip-encoded?

I know these questions keep you up at night, so here’s what you can do:

  1. Install Live HTTP Headers
  2. Open it (Tools > Live HTTP Headers)
  3. Visit a page / press refresh
  4. Rejoice

live_headers.png

As you visit a page, you’ll see HTTP headers fly by as your browser requests elements. If items are cached, the browser may not request them at all (awesome!) or may request the element and get a 304 “Not Modified” response (slightly less awesome, you still had to check with the server). I’ve written more on cache behavior, and Live HTTP Headers is a great way to learn about HTTP caches (something every webdev should be interested in for performance reasons).

Even better, you can “replay” any header, editing the data that is sent. This is useful when testing or debugging cache or gzip encoding behavior.

Debugging IE: The lost chapter

Argh, unfortunately IE lacks these wonderful tools. There is a script debugger, but it doesn’t hold a candle to Firebug. In fact, I often just resort to alert statements, which make you shudder after being spoiled by Firebug.

One less painful method I use is this:

In your HTML: <div id="log"></div>

In your Javascript:

function log(str){
  var log = document.getElementById("log")
  if (log){ // let's be safe...
     log.innerHTML += str + "<br/>";
  }
}

Usage: log("Hi there!");

Optional: create an eval box:
<input name="eval" id="eval"/>
<a href="javascript:void(0);" onClick="log(eval(document.getElementById('eval').value));">go</a>

It’s nothing fancy, just a simple logging function that appends text to a div. Yes, it’s brutal, but it’s better than alert() statements, especially if you have a loop (unless you like repetitive stress injuries or want to condition yourself to fear dialog boxes). If anyone knows a good way to debug javascript in IE I’d love to know. The tools I’ve tried have been very clumsy and disjoint, taking you out of the browser.

I try to do 95% of my development in Firefox, and debug IE-specific issues (like erratic substr behavior) using this method.

Keep Getting Better

Web Developer Toolbar and Firebug can do way more than I’ve described here. Like the 80/20 rule, these are commands I use most frequently that give me the best bang for my buck. Take a few minutes to learn these tools and you’ll save hours down the line. And here’s a few more tools for web development.

These tools might not save you from getting a nervous twitch in one eye from building web apps, and that’s ok. They’ll save you from getting that twitch in both.

Join 450k Monthly Readers

Enjoy the article? There's plenty more to help you build a lasting, intuitive understanding of math. Join the newsletter for bonus content and the latest updates.

Speed Up Your Javascript, Part 2: Downloadable Examples!

I’m happy people are finding the article on javascript optimization useful. But I made a giant, horrible mistake. A mistake that befalls many tutorials.

I didn’t include actual, working examples for you to play with. You can talk all you want, but until you’ve got some code, it’s just theory and listless sighs. And without seeing the code walk (or run! Get it?), it’s hard to believe that it really works. So here’s some live, working examples to show these techniques in action:

The examples are free and in the public domain. However, if you find it useful I’d appreciate you sharing it with friends or dropping me a note. I like knowing what explanation styles work so I can do more of it in the future.

And now, the guided tour of what you’ll see in the zip file.

Eliminate Tedium: Use Scripts

Automate, automate, automate! I’ve created a set of batch files (and .sh files for you Linux/UNIX gurus) to get you started:

  • makeall.bat: Runs the commands below
  • make_libraries.bat: Combines *.js into “allfiles.lib.js”, and combines files prefixed with “example” into “example.lib.js”.
  • pack_js.bat: Compresses *.js and creates *.js.packed
  • add_cache_header.bat: Inserts the PHP caching header into the .js.packed files, creating js.packed.php
  • cleanup.bat: Removes generated files, leaving you with your original .js files.

These are templates – modify them to suit your own needs. If you find yourself typing a command again and again, throw it into a script.

Compressing Javascript

I’ve included custom_rhino.jar which does the compression (more info).

There are a few javascript files for demo purposes. The first is example_compressed.js, which has extremely long variable names in various scopes (local and global). Take a look at this sucker, it’s ripe to get crunched by Rhino:

/* these names are global, so will not get compressed (could be used elsewhere) */
var LongName = 1;
var OtherLongName = 2;
var ReallyReallyLongName = 3;
var AbsurdlyLongNameImNotQuiteSureWhyAnyoneWouldUseThisButItIsGoodForExamples = 3;

/* these names are local to foo(), and will get compressed. Isn't Rhino awesome? */
function foo(){

var LongName = 1;
var OtherLongName = 2;
var ReallyReallyLongName = 3;
var AbsurdlyLongNameImNotQuiteSureWhyAnyoneWouldUseThisButItIsGoodForExamples = 3;
var LongName = 1;
var OtherLongName = 2;
var ReallyReallyLongName = 3;
var AbsurdlyLongNameImNotQuiteSureWhyAnyoneWouldUseThisButItIsGoodForExamples = 3;
(repeated...)
return 0; // of course :)
}

log("Compressed Example Loaded!");

A typical “javascript compressor” will simply remove extra spaces and comments, which doesn’t help much. Rhino actually analyzes your code: when it sees global variables, it knows the name shouldn’t be changed since other scripts may reference them.

But local variables are another story. Since locals are only referenced inside of their function, they are ripe for squashing. This is your javascript on Rhino:

var LongName=1;
var OtherLongName=2;
var ReallyReallyLongName=3;
var AbsurdlyLongNameImNotQuiteSureWhyAnyoneWouldUseThisButItIsGoodForExamples = 3;

function foo(){
var _1=1;
var _2=2;
var _3=3;
var _4=3;
var _1=1;
var _2=2;
var _3=3;
var _4=3;
var _1=1;
var _2=2;
...
return 0;
}
log("Compressed Example Loaded!");

Any questions?

Rhino trampled the variable names and replaced them with the shortest identifiers it could find: _1, _2, etc. This saves a lot of space, and has the side-effect of partially obfuscating your code (if you are looking for that sort of thing).

Dynamic Import and Delayed Loading

Now here’s the fun stuff: example_imported.js and example_delayed.js don’t do anything special, except call a logging function that shows when they were loaded.

Check out sample.html

<html>
<head>
<!-- only put scripts here if you really need to -->
</head>
<body>

<!-- Scripts that need to run first -->
<script src="import.js"></script>
<script>
/* Simple logger -- looks for div with id "log".
   We want this available from the get-go. */

function log(str){
  var logger = document.getElementById("log");
  if (logger){
    logger.innerHTML += new Date().toString() + ": ";
    logger.innerHTML += str;
    logger.innerHTML += "<br/>";
  }
}
</script>

<!-- content, images, tables, etc. -->
Put content here...

<div id="log">
</div>

<!-- include packed version -->
<script src="example_compressed.js.packed"></script>

<!-- dynamic import -->
<script>
    $import('example_imported.js');
</script>

<!-- delayed loading -->
<script>
    function loadDelayedScripts(){
        $import('example_delayed.js');
    }

    var delay = 5; // wait and then load the file
    setTimeout("loadDelayedScripts()", delay * 1000);
</script>

<!-- other heavy scripts, tracking code, etc. -->
</body>
</html>

Take a look at the result:

sample_html.png

Notice how $import acts immediately, and the delayed load happens 5 seconds later. All the scripts call the log function, but it could be any callback, like registerLoadEvent() or displayHiddenFeature(). Leave that for your imagination.

Creating Library Files

It can also be helpful to combine smaller files into a larger one, especially if they don’t change often. This reduces the number of requests the browser makes and you don’t suffer the overhead for each item.

Downloading one 10k script is faster than ten 1k ones – browsers can only have a certain number of connections open at a time. Once you’ve got the connection going, you may as well cram a larger file down.

The UNIX “cat” (or Windows “type”) command is perfect for this. If you set a filter (example*.js) you can combine files with the same prefix into a library:

cat *.js > allfiles.lib.js
cat example*.js > example.lib.js

And since the library ends in .js, it will get packed along with the other .js files in our packing script.

Adding PHP Cache Headers

The last step is to add the cache headers to the files. There is a general “set_cache_header.php” file that is combined with the packed javascript (.js.packed) to create the js.packed.php files. Assuming your server is configured to serve PHP, this will set the caching headers for 3 days (change this to any number you like).

Always Keep learning

We’re never done learning — I’d love to see what other tricks you use to speed up your javascript or automate the “build” process.

Remember that there are all sorts of interesting callbacks you can do. The scripts, once loaded, can call functions to display previously hidden features in the page: as scripts are loaded, menu items/images/text could appear. Or, you can just have one master script that $imports the others, so you don’t need to monkey with your HTML file if you add a new javascript file (some Javascript libraries behave this way). The possibilities go on: use some, all, or none of these techniques. Experiment and learn what works for you.

Happy hacking.

Join 450k Monthly Readers

Enjoy the article? There's plenty more to help you build a lasting, intuitive understanding of math. Join the newsletter for bonus content and the latest updates.

Speed Up Your Javascript Load Time

Javascript is becoming increasingly popular on websites, from loading dynamic data via AJAX to adding special effects to your page.

Unfortunately, these features come at a price: you must often rely on heavy Javascript libraries that can add dozens or even hundreds of kilobytes to your page.

Users hate waiting, so here are a few techniques you can use to trim down your sites.

(Check out part 2 for downloadable examples.)

Find The Flab

Like any optimization technique, it helps to measure and figure out what parts are taking the longest. You might find that your images and HTML outweigh your scripts. Here’s a few ways to investigate:

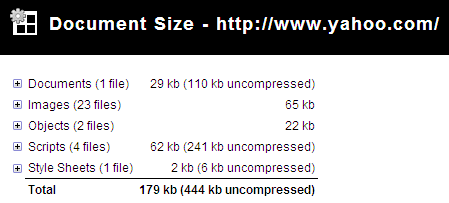
1. The Firefox web-developer toolbar lets you see a breakdown of file sizes for a page (Right Click > Web Developer > Information > View Document Size). Look at the breakdown and see what is eating the majority if your bandwidth, and which files:

yahoo size

2. The Firebug Plugin also shows a breakdown of files – just go to the “Net” tab. You can also filter by file type:

yahoo_firebug.png

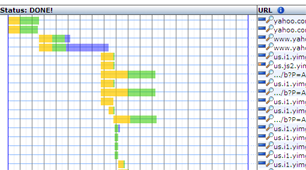
3. OctaGate SiteTimer gives a clean, online chart of how long each file takes to download:

yahoo_octagate.png

Disgusted by the bloat? Decided your javascript needs to go? Let’s do it.

Compress Your Javascript

First, you can try to make the javascript file smaller itself. There are lots of utilities to “crunch” your files by removing whitespace and comments.

You can do this, but these tools can be finnicky and may make unwanted changes if your code isn’t formatted properly. Here’s what you can do:

1. Run JSLint (online or downloadable version) to analyze your code and make sure it is well-formatted.

2. Use YUI Compressor to compress your javascript from the command line. There are some online packers, but the YUI Compressor (based on Rhino) actually analyzes your source code so it has a low chance of changing it as it compresses, and it is scriptable.

Install the YUI Compressor (it requires Java), then run it from the command-line (x.y.z is the version you downloaded):

java -jar yuicompressor-x.y.z.jar myfile.js -o myfile-min.js

This compresses myfile.js and spits it out into myfile-min.js. Rhino will remove spaces, comments and shorten variable names where appropriate.

Using Rhino, I pack the original javascript and deploy the packed version to my website.

Debugging Compressed Javascript

Debugging compressed Javascript can be really difficult because the variables are renamed. I suggest creating a “debug” version of your page that references the original files. Once you test it and get the page working, pack it, test the packed version, and then deploy.

If you have a unit testing framework like jsunit, it shouldn’t be hard to test the packed version.

Eliminating Tedium

Because typing these commands over and over can be tedious, you’ll probably want to create a script to run the packing commands. This .bat file will compress every .js file and create .js.packed:

compress_js.bat:
for /F <span class="tex-inline-html" alt="F in ('dir /b *.js') do java -jar custom_rhino.jar -c ">F in ('dir /b &middot;.js') do java -jar custom_rhino.jar -c </span>F > %%F.packed 2>&1

Of course, you can use a better language like perl or bash to make this suit your needs.

Optimize Javascript Placement

Place your javascript at the end of your HTML file if possible. Notice how Google analytics and other stat tracking software wants to be right before the closing </body> tag.

This allows the majority of page content (like images, tables, text) to be loaded and rendered first. The user sees content loading, so the page looks responsive. At this point, the heavy javascripts can begin loading near the end.

I used to have all my javascript crammed into the <head> section, but this was unnecessary. Only core files that are absolutely needed in the beginning of the page load should be there. The rest, like cool menu effects, transitions, etc. can be loaded later. You want the page to appear responsive (i.e., something is loading) up front.

Load Javascript On-Demand

An AJAX pattern is to load javascript dynamically, or when the user runs a feature that requires your script. You can load an arbitrary javascript file from any domain using the following import function:

function $import(src){
  var scriptElem = document.createElement('script');
  scriptElem.setAttribute('src',src);
  scriptElem.setAttribute('type','text/javascript');
  document.getElementsByTagName('head')[0].appendChild(scriptElem);
}

// import with a random query parameter to avoid caching
function $importNoCache(src){
  var ms = new Date().getTime().toString();
  var seed = "?" + ms;
  $import(src + seed);
}

The function $import('http://example.com/myfile.js') will add an element to the head of your document, just like including the file directly. The $importNoCache version adds a timestamp to the request to force your browser to get a new copy.

To test whether a file has fully loaded, you can do something like

if (myfunction){
  // loaded
}
else{ // not loaded yet
  $import('http://www.example.com/myfile.js');
}

There is an AJAX version as well but I prefer this one because it is simpler and works for files in any domain.

Delay Your Javascript

Rather than loading your javascript on-demand (which can cause a noticeable gap), load your script in the background, after a delay. Use something like

var delay = 5;
setTimeout("loadExtraFiles();", delay * 1000);

This will call loadExtraFiles() after 5 seconds, which should load the files you need (using $import). You can even have a function at the end of these imported files that does whatever initialization is needed (or calls an existing function to do the initialization).

The benefit of this is that you still get a fast initial page load, and users don’t have a pause when they want to use advanced features.

In the case of InstaCalc, there are heavy charting libraries that aren’t used that often. I’m currently testing a method to delay chart loading by a few seconds while the core functionality remains available from the beginning.

You may need to refactor your code to deal with delayed loading of components. Some ideas:

  • Use SetTimeout to poll the loading status periodically (check for the existence of functions/variables defined in the included script)
  • Call a function at the end of your included script to tell the main program it has been loaded

Cache Your Files

Another approach is to explicitly set the browser’s cache expiration. In order to do this, you’ll need access to PHP or Apache’s .htaccess so you can send back certain cache headers (read more on caching).

Rename myfile.js to myfile.js.php and add the following lines to the top:

<?php
    header("Content-type: text/javascript; charset: UTF-8");
    header("Cache-Control: must-revalidate");
    $offset = 60 * 60 * 24 * 3;
    $ExpStr = "Expires: " .
    gmdate("D, d M Y H:i:s",
    time() + $offset) . " GMT";
    header($ExpStr);
?>

In this case, the cache will expire in (60 * 60 * 24 * 3) seconds or 3 days. Be careful with using this for your own files, especially if they are under development. I’d suggest caching library files that you won’t change often.

If you accidentally cache something for too long, you can use the $importNoCache trick to add a datestamp like “myfile.js?123456″ to your request (which is ignored). Because the filename is different, the browser will request a new version.

Setting the browser cache doesn’t speed up the initial download, but can help if your site references the same files on multiple pages, or for repeat visitors.

Combine Your Files

A great method I initially forgot is merging several javascript files into one. Your browser can only have so many connections to a website open at a time — given the overhead to set up each connection, it makes sense to combine several small scripts into a larger one.

But you don’t have to combine files manually! Use a script to merge the files — check out part 2 for an example script to do this. Giant files are difficult to edit – it’s nice to break your library into smaller components that can be combined later, just like you break up a C program into smaller modules.

Should I Gzip It?

You probably should. I originally said no, because some older browsers have problems with compressed content.

But the web is moving forward. Major sites like Google and Yahoo use it, and the problems in the older browsers aren’t widespread.

The benefits of compression, often a 75% or more reduction in file size, are too good to ignore: optimize your site with HTTP compression.

All done? Keep learning.

Once you’ve performed the techniques above, recheck your page size using the tools above to see the before-and-after difference.

I’m not an expert on these methods — I’m learning as I go. Here are some additional references to dive in deeper:

Keep your scripts lean, and read part 2 for some working examples.

Join 450k Monthly Readers

Enjoy the article? There's plenty more to help you build a lasting, intuitive understanding of math. Join the newsletter for bonus content and the latest updates.